Chip0u - A CHIP-8 Interpreter
It is known that a game engineer needs to be curious, as this is one of the essential characteristics to create interactive and fun experiences. And this is exactly what I love the most about what I do: being curious, after all “why yes is not an answer”. I always want to know how things work, how I can improve them, and what are the challenges involved.
That’s why I combined my curiosity with my passion for emulators and older machines. In this way, gathering several abundant references from the internet, I decided to create an interpreter for CHIP-8. A very basic one, based on the original interpreter. The CHIP-8 is a simple interpreted programming language, used to create games on 8-bit computers in the 70s and 80s. I always found it fascinating how these games were made, and wanted to learn more about them.
And, contrary to my expectations, I realized that the project would be simpler than I thought! Which is great for a novice in CS like me, who had never done anything like that before. I saw that the more complex instructions are slightly simpler if understood. For example, the instruction that draws a sprite on the screen - the most complex one, DXYN - is nothing more than a loop that reads the memory and draws the pixels on the screen. The instruction that jumps to a subroutine - the most used one, 2NNN - is nothing more than a call to a function that saves the return address on the stack. The instruction that skips the next instruction if a key is pressed - most used in games, EX9E - is nothing more than a conditional that checks the state of the keypad. And so on.
Well, but I write this post more about the why and my process of study and development, than about a step-by-step guide of the how. There are countless abundant resources on the networks to be surfed on the topic. It is a project said to be “hello world” for emulation of old chips.
However, even though it is something of an introductory nature, I strongly recommend that it be done! Altogether, it took me 2 days to develop a usable version, being almost 1 day for enumeration of references, research and studies, and another for implementation and error correction. It was a very rewarding experience, that taught me a lot about the history of games, the logic of programming, and the creativity of developers. In addition, I had a lot of fun testing the games I found on the internet, such as Pong, Space Invaders, Tetris, and others.
What is CHIP-8?
The CHIP-8 is a simple interpreted programming language, created to make games on 8-bit computers in the 70s and 80s. It was made to be easy to learn and use, and to work on many different hardware.
It was used to make many kinds of games, such as Pong, Space Invaders, Tetris, and others, or even to make simple programs, such as calculators, clocks, and others.
The CHIP-8 was developed by Joseph Weisbecker in the mid-70s, to allow games to be programmed more easily on the COSMAC VIP and Telmac 1800 microcomputers1. The CHIP-8 is an interpreted language that runs on a virtual machine, that is, a program that simulates a computer system. The CHIP-8 virtual machine has a simple architecture, with 16 general-purpose registers, a stack, a memory of 4 KB, and a display of 64x32 pixels.
Specifications
The CHIP-8 has many features, which make it a very simple and versatile programming language. Some of them are:
- A very simple instruction set, which has only 35 instructions! - super simple to understand and implement
- A 16 general-purpose registers, which can store data, and do arithmetic and logical operations -
V0toVF - A
64x32 pixelmonochrome display, which can draw graphics, and show text - A program counter, which can track the current instruction, and run the program
- A
16-keyhexadecimal keypad, which can input data, and control the games - A
16-bitaddress bus, which can access the memory, and jump to different parts of the program - A
16-bitindex register, which can store the memory address, and access the memory - A
16-bitstack pointer, which can store the return address, and access the stack - An
8-bitdelay timer, which can count the time, is decremented at60Hz, until it reaches zero - An
8-bitsound timer, just like the delay timer, but it plays a sound when it reaches zero
Memory
About the memory layout, the original CHIP-8 has 4KB of memory, which is divided into several parts. The first 512 bytes are reserved for the interpreter, from 0x000 to 0x1FF. A modern interpreters use the first 512 bytes just for the font set, as the interpreter is not loaded in the memory, and the rest of the memory for the program. The rest of the memory is used for the program, from 0x200 to 0xFFF.
If you want to run the old programs, you should need to load the interpreter in same memory space; If not, you can use the entire memory for the program.
Font
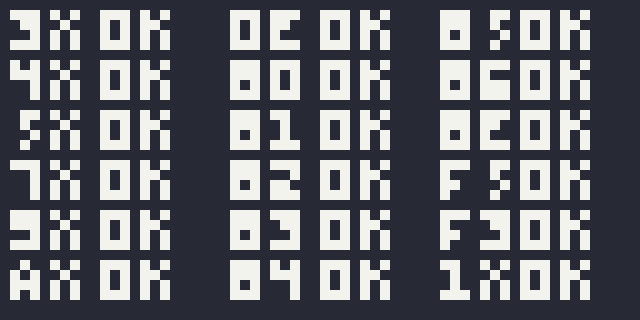
It is desirable to have a built-in font set, which is a set of characters that can be drawn on the screen. The CHIP-8 has a built-in 4x5 pixel font set, which contains the characters from 0 to F. It is stored in the memory, and can be used by the interpreter to draw text on the screen. Each character is 4 bytes long, and must be - if no extension is used - 4x5 pixels in size.
The most common font set is the one is shown below:
1
2
3
4
5
6
7
8
9
10
11
12
13
14
15
16
17
18
19
uint8_t chip8_fontset[16 * 5] =
{
  0xF0, 0x90, 0x90, 0x90, 0xF0, // 0
  0x20, 0x60, 0x20, 0x20, 0x70, // 1
  0xF0, 0x10, 0xF0, 0x80, 0xF0, // 2
  0xF0, 0x10, 0xF0, 0x10, 0xF0, // 3
  0x90, 0x90, 0xF0, 0x10, 0x10, // 4
  0xF0, 0x80, 0xF0, 0x10, 0xF0, // 5
  0xF0, 0x80, 0xF0, 0x90, 0xF0, // 6
  0xF0, 0x10, 0x20, 0x40, 0x40, // 7
  0xF0, 0x90, 0xF0, 0x90, 0xF0, // 8
  0xF0, 0x90, 0xF0, 0x10, 0xF0, // 9
  0xF0, 0x90, 0xF0, 0x90, 0x90, // A
  0xE0, 0x90, 0xE0, 0x90, 0xE0, // B
  0xF0, 0x80, 0x80, 0x80, 0xF0, // C
  0xE0, 0x90, 0x90, 0x90, 0xE0, // D
  0xF0, 0x80, 0xF0, 0x80, 0xF0, // E
  0xF0, 0x80, 0xF0, 0x80, 0x80  // F
};
If you’re using the Octo IDE, you can take advantage of a very useful resourc: ‘EZ-Writer’, by John Earnest.
Display
The display is a 64x32 monochrome display (black & white, where each pixel can be on or off). In a short way, it is a 2D array of 2048 boolean values, where true means that the pixel is on, and false means that the pixel is off.
Orignially, the display has a refresh rate of 60Hz, which means that it is updated 60 times per second. This is a very important feature, as it allows the games to run smoothly, and to be responsive to the inputs.
The drawing instruction DXYN is used to draw a sprite on the screen, and it is the most complex instruction of the CHIP-8. It reads N bytes from the memory, and draws them on the screen, at the position (VX, VY). If a pixel is already on, and the new pixel is also on, the pixel is turned off, and the VF register is set to 1. Otherwise, the pixel is turned on, and the VF register is set to 0. This is used to detect collisions between the sprites, and to draw the sprites on the screen.
But this has some drawbacks, as this method of drawining give us a flickering effect. When the sprite moves, it firstly is cleared from the screen (flipping the pixels), and then it is drawn again. This is not a problem for the original games on real hardware, but it is a problem for the modern interpreters, as it causes a flickering effect.
To mitigate this, the modern interpreters use a “double buffering” technique (well, not exactly a double buffering, but it is similar), where we keep a second array of pixels as color. Wen a draw instruction is called, we draw to the final display based on the colors array, lerping the pixels. This way, we can avoid the flickering effect while having a nice CRT-like effect.
Stack
The stack is a simple data structure, which is used to store the return addresses of the subroutines. It is a 16-bit array, which can store up to 16 return addresses. The stack pointer is used to keep track of the current position of the stack, and to access the return addresses.
To better understand the stack, let’s take a look at the instruction 2NNN, which is used to jump to a subroutine. It saves the current position of the program counter on the stack, and then jumps to the address NNN. This is a very useful feature, as it allows the programs to call subroutines, and to return to the main program.
So the stack is used to store the return addresses of the subroutines, and to return to the main program. It is a very important feature, as it allows the programs to be more modular, and to be more organized.
Timers
The CHIP-8 has two timers, which are used to count the time, and to play a sound. The delay timer is an 8-bit timer, which is decremented at 60Hz, until it reaches zero. The sound timer is also an 8-bit timer, which is decremented at 60Hz, until it reaches zero. When the sound timer reaches zero, it plays a sound.
Keypad
In CHIP-8, the keypad is a 16-key hexadecimal keypad, which is used to input data, and to control the games. It is a very simple input device, which has only 16 keys, and can be used to input the hexadecimal digits from 0 to F.
Its disposal is a 4x4 grid:
| 1 | 2 | 3 | C |
| 4 | 5 | 6 | D |
| 7 | 8 | 9 | E |
| A | 0 | B | F |
The most common mapping:
| 1 | 2 | 3 | 4 |
| Q | W | E | R |
| A | S | D | F |
| Z | X | C | V |
Main execution loop
The main execution loop of the CHIP-8 is very simple, and can be divided into 3 main parts:
- Fetch the instruction from the memory
- Read the instruction from the memory, and increment the program counter
- Decode the instruction, and execute it
- The instruction is a
16-bitvalue, which is divided into several parts- The first
4 bitsare the opcode, which is used to identify the instruction - The next
12 bitsare the ‘arguments’, which are used to pass the data to the instruction 0x1234is a common way to represent the instruction, where0x1is the opcode, and0x234is the arguments
- The first
- The instruction is a
- Execute the instruction, and update the timers
Some imporant instructions
00E0- Clear the display00EE- Return from a subroutine1NNN- Jump to addressNNN2NNN- Call subroutine atNNN3XNN- Skip the next instruction ifVXequalsNN7XNN- AddNNtoVX8XY1- SetVXtoVX OR VY8XY5- SetVXtoVX - VY, and setVFto0if there is a borrow, and1otherwise- Borrow is when
VXis less thanVY
- Borrow is when
ANNN- Set the index register to the addressNNNDXYN- Draw a sprite at positionVX, VYwithNbytes of sprite data starting at the address stored in the index register. SetVFto1if any set pixels are changed to unset, and0otherwise.F007- Store the current value of the delay timer inVX- … and more
How I did it
As I’m had no experience with emulators, I started by reading the documentation of CHIP-8, which is easily found on the internet. Then, I searched for more references, such as forums, blogs, and videos, to clarify some doubts. I also found the source code of other interpreters, which can be found on GitHub, and studied how they are implemented. Finally, I tried to design and implement my own interpreter, using the knowledge I had acquired, and the tools I had at my disposal.
Fine, but how did I do it? - Well, I used C++ as the programming language, and Raylib and ImGui as the graphical libraries. For the lookup table I used a simple map of function pointers. In that way, I could easily map the opcode to the function that would execute it, and later on disassemble it! - Wich was really useful for debugging, to make sure that the instructions were being executed correctly - In almost every repository I found, the authors used a big switch-case to map the opcodes to the functions, but I found the map of function pointers to be more elegant and easy to maintain.
Display is simple to implement, as it is a 64x32 monochrome display. I used the Raylib library to draw the pixels on the screen, and to show the text. I also used the ImGui library to show the registers, the memory, and the stack. I found these libraries to be very useful, as they allowed me to write, test, and debug the code more easily.
Libraries used:
What about the sound?
Well, the CHIP8 has a very simple sound model, but i have not implemented it yet…
Facing the challenges
But it wasn’t all easy and smooth. I also faced some challenges that made me think and learn more. Some of them were:
- Understanding the documentation of CHIP8, which was sometimes confusing for a enthusiast like me. I had to read it several times, and search for more references, to clarify some doubts.
- Getting the hexadeximal knowledge to work with the instructions, as I had never used extensively before. But with a little bit of study, and dedication, it becomes more natural and intuitive.
- Dealing with the bugs that appeared during the execution of the games. Some were caused by errors in my implementation, others by differences between the CHIP-8 extensions2. I had to use the debugger and the disassembler that I implemented to find and fix the bugs.
- Optimizing the performance of the interpreter, which depended on several factors, such as the clock frequency, the waiting time of the inputs, and the rendering mode. I had to test various values and configurations, and find a balance between fidelity and fluidity.
Building your own CHIP-8 interpreter
If you are interested in building your own CHIP8 interpreter, I recommend that you start by reading the documentation of CHIP8, which is available on the internet. Then, you can search for the source code of other interpreters, which can be found on GitHub, and study how they are implemented. Finally, you can try to implement your own interpreter, using the knowledge you have acquired, and the tools you have at your disposal.
- CHIP-8 Reference is really useful to understand the instructions and the architecture of the CHIP-8.
- For a guide, I recommend the Tobias V. Langhoff blog: Guide to making a CHIP-8 emulator
- The next repo contains a lot of references and a very good guide to start your own interpreter: Awesome CHIP-8
Checkout my CHIP-8 interpreter
If you are interested in checking out my CHIP8 interpreter, you can find it on the SOHNE GitHub repository. The repository contains the source code of the interpreter, as well as the games I tested with it. You can download the repository, compile the code, and run the games on your computer. I hope you enjoy it, and that it inspires you to build your own interpreter.
- CHIP0U - CHIP8 Interpreter - GitHub repository
- CHIP0U - Live Demo - HTML5 Live demo, compiled with Emscripten
Conclusion
It was a very rewarding experience! It taught me a lot more about low-level programming, and for a plus, a little bit about the history of games!
Of course, it was not perfect, and there are many things that I would like to improve!, like supporting the sound, some of the CHIP-8 extensions, and the performance of the interpreter. But I’m really happy with the result, and I’m proud of what I’ve accomplished.
This post was made for me to better understand the process of creating a CHIP-8 interpreter, and to share my experience with others, to inspire them to build their own interpreter and to have fun with it.
See you in the next post!
Live long and prosper! \\//_